
Table Of Contents
- Purchase the Right Subscription
- Use Azure Advisor
- Set Azure Alerts
- Manage Data Retention and Access in Azure Storage
- Use Azure Cost Management Tool
- Purchase Reserved VM Instances
- Monitor Application Insights and App Service Diagnostics to Identify Efficiency Issues
- Use Correct App Service Plans For Your Needs
- Optimize Scale In and Scale Out Ruleset
- Take Microsoft Cost Management Course
- Spread the CPU Load Over Time
- Review Your Costs Periodically
Purchase the Right Subscription
It may go without saying, but this will be sitting at the heart of your expenses. Azure offers a Pay-as-you-go subscription, where your costs are only associated with the usage of Azure services, alongside Enterprise solutions, aiming at larger companies that can commit to paying more and for a certain period of time, but those can be beneficial (i.e. coupled with O365 Subscription for a lower cost, additional support, discount on certain services, or additional reports) for established companies that have a good understanding of their business needs. More on Azure subscriptions can be found here.
Use Azure Advisor
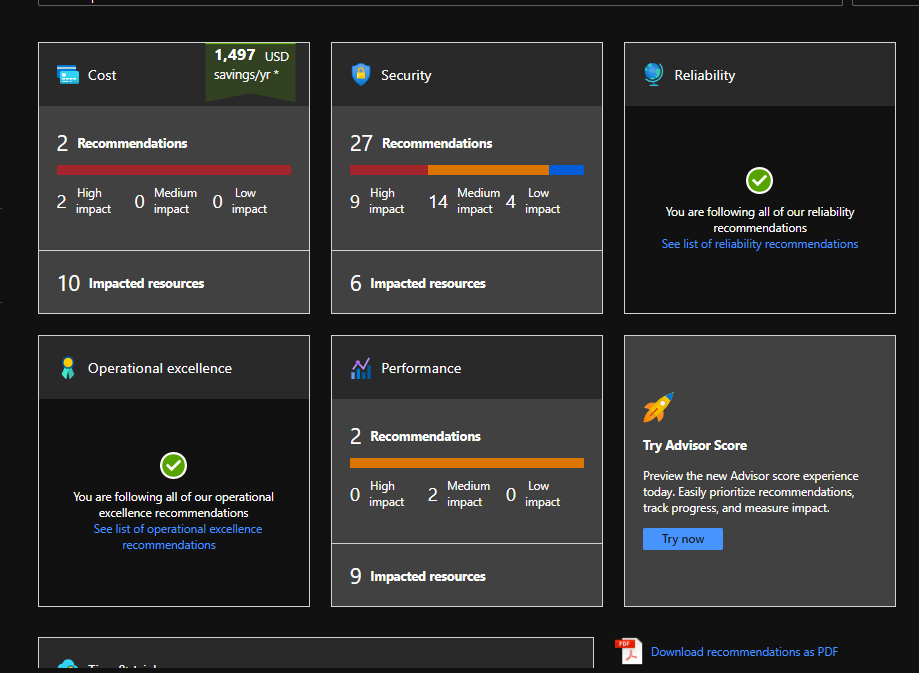
Azure Advisor is a great tool, available for any subscription and completely free of charge. It can be found in Azure Portal. The main dashboard shows the summary of any tips related to:
- Cost – Shows underused resources that could potentially be scaled down and identifies the ones which could benefit from some fixed time commitment, but for a lower price.
- Security – While not directly affecting the cost, the topic of this article, it can be expensive to become a victim of a cyberattack and free tips on security are worth addressing.
- Reliability – Again, this might not be immediately associated with your monthly bill, but it will if your users experience downtime!
- Operational Excellence – Tips on managing your resources and permissions within your organization. This helps to keep your Azure services tidy. For example, it could suggest enforcing some policies, like which locations are allowed to be deployed to.
- Performance
I frequently re-visit Azure Advisor. It’s especially important to use it when you deal with multiple subscriptions, app service plans, and other resources. The analytical eye of Azure Advisor can spot things, that a human eye can easily miss.
Set Azure Alerts
This may not immediately be obvious, but alerts can save a lot of money. The resource usage is what will have some serious impact on your monthly bill. For example, I’ve seen a situation, in which an app service was caught in an endless loop and, as a result, ended up causing an app service plan to scale up to many instances, but most importantly – stay there for days without notifying anyone. To put that into context; Imagine that you have an app service plan that costs £300 a month (billed per instance), which means roughly £75 per week. If that plan ends up quietly scaling to 5 instances for a week without any mitigation, you’ve just added some £300 to your monthly bill for that week alone (base cost of £75 + 4 x £75 for each additional instance), which could be avoided altogether if you were notified about it in time.
The above is just an example, but there’s some impressive granularity in terms of what you can be alerted about. The possibilities are endless and the cost of alerts is marginal.
This will come in especially handy in situations that you already identified as possibly dangerous and need some means of monitoring the resource’s state, without having to check it manually daily!
More on Azure Alerts can be found here.
Manage Data Retention and Access in Azure Storage
Do you really need to have instant and reliable access to all of your data at any given time? For user management system – sure, it’s desired and I won’t argue with it. What about Job Tracking tables or Audit Trail tables? I’d imagine you only have a peek at some of this data when an issue arises. Do you also need to keep an entry for each of those successfully finished jobs forever? Or an audit of changes made to another table 3 years ago? In many cases, the answer to this question is no, you don’t.
The days of manual housekeeping jobs that run periodically and clean up and manage historic, redundant data are pretty much gone now. Service providers usually have built-in solutions for any type of scenario, as they understand the modern user’s needs, and Azure Storage is no different.
Before I explain what tools are available, it’s important to note that your storage account needs to be a v2 account to take advantage of this point. To check that, you can navigate to your Storage Account resource in Azure Portal and look up a value of Account Kind – it should say StorageV2 (general purpose v2). If the Account Kind comes up as Storage (general purpose v1), you should consider migrating to v2. It’s more cost-effective and migration is a one-click process.
So, how do we manage the data in our Azure Storage? In the Azure Portal of your storage account, search for Lifecycle Management on the left-hand side pane. There, you can add rules to either delete or limit access to data that’s X-time old or hasn’t been modified for some time. You can add rules globally or for certain blobs only, so you have full control over your account.
Deleting the data is straightforward, but what do I mean by limiting access to the resources? The lifecycle management policy lets you choose one of 3 access tiers for your blobs:
- Hot – This tier is designed for fast access to the data, but also the most expensive to store. It’s made for resources that are accessed frequently, so the cost per call is relatively cheap.
- Cool – Slightly higher per call cost, but cheaper to store that Hot tier. Designed for data accessed infrequently.
- Archive – Very cheap to store the data in the archive, but the access is limited due to a fairly expensive per call cost – the most expensive of all tiers. This tier is designed for the data accessed rarely.
As you can simply infer from the above list – the cooler the storage, the cheaper the storage cost is and the more expensive the access cost becomes.
A full instruction on how to set your Lifecycle Management rules and in-depth documentation can be found here.
Use Azure Cost Management Tool
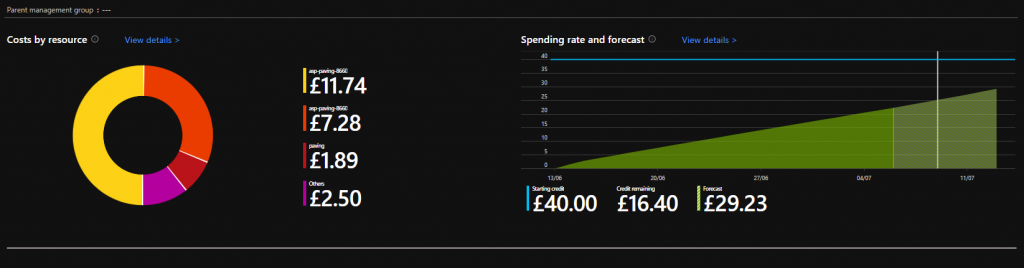
This tool is provided for free for every (I think…) Azure subscription. It can be found in Azure Portal (just search for Cost Management). You can view your current spending and forecasts based on a resource group or individual app service.
I find it useful at times, but the cost breakdown doesn’t always add up to the total. Nonetheless, Cost Management comes in handy when identifying general trends.
More on Cost management can be found here.
Purchase Reserved VM Instances
The idea behind Reserved Instances is pretty simple. When you spin up a VM, normally, you just pay for the usage. That’s equivalent to the PAYG model. You can think of Reserved Instances as a “Pay monthly” option for your VMs. You can commit to 1, 3, or 5 years and set monthly or upfront billing. Different machines are available depending on what you go for. Naturally, the longer you commit to, the cheaper the overall cost will be.
You must think carefully when purchasing those. You only want to do that if you’re certain that you need that VM for the chosen amount of time. Otherwise, we all know how expensive VMs can be.
More on Reserved Instances can be found here.
Monitor Application Insights and App Service Diagnostics to Identify Efficiency Issues
When I first heard of Application Insights (AI), I immediately disregarded it as “yet another logging tool”, but my opinion on it quickly shifted when I started using it to resolve a certain issue with one of my applications – all other diagnoses I used failed to pin down the problem. I later realized it helps with Azure cost management too!
So what is App Insights and what can we use it for? As described in the MS Docs:
Application Insights, a feature of Azure Monitor, is an extensible Application Performance Management (APM) service for developers and DevOps professionals. Use it to monitor your live applications. It will automatically detect performance anomalies, and includes powerful analytics tools to help you diagnose issues and to understand what users actually do with your app. It’s designed to help you continuously improve performance and usability. It works for apps on a wide variety of platforms including .NET, Node.js, Java, and Python hosted on-premises, hybrid, or any public cloud. It integrates with your DevOps process, and has connection points to a variety of development tools. It can monitor and analyze telemetry from mobile apps by integrating with Visual Studio App Center.
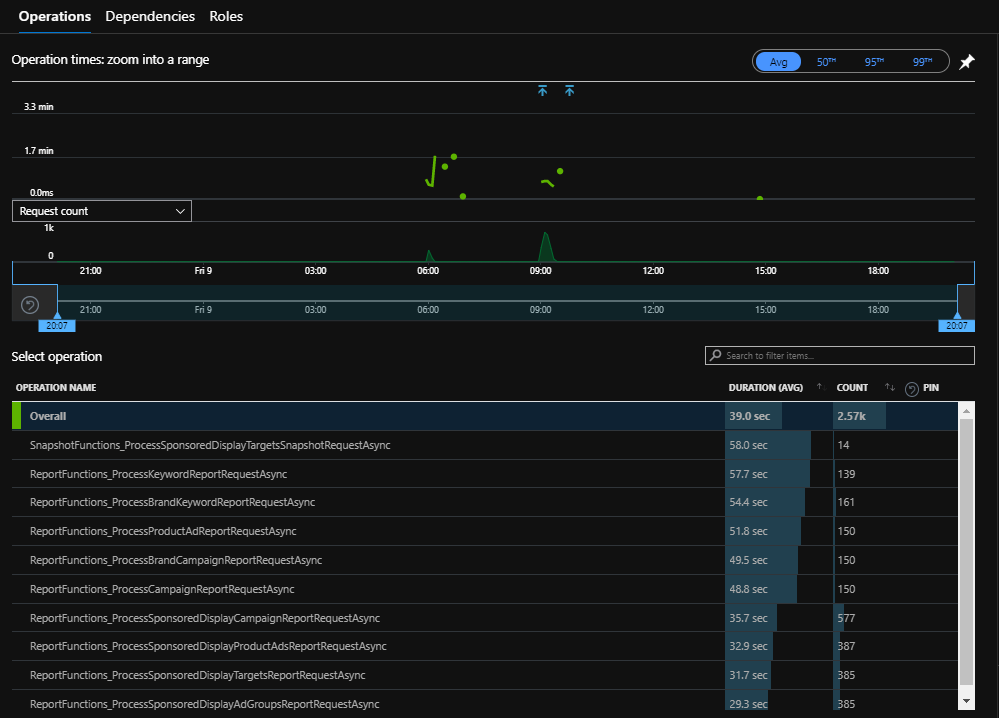
But this is a cost-related article, so why mention AI at all? Your application can just “work” in many cases, but have a lot of room for optimization. For example, I migrated and consolidated an existing microservice that pulls data from Google Search Console API, from a .NET Framework Webjob to a self-contained .NET Core Azure Function (AF). All this takes some load off my existing app service plan and saves money on scaling as the microservice is heavily used every day. Shortly after the migration, I’ve noticed that the Azure Function costs much more than the previous Webjob and decided to investigate the performance by enabling App Insights on the AF. The dedicated Performance tab within the AI immediately showed me that my execution time vs invocation count is way off. Not going into details of AF pricing, they’re designed for short-lived, scalable functions. The long execution time of a single instance can significantly bump up the cost compared to short-running functions with continuation actions or durable orchestration. Application Insights dashboard helped me identify that my functions were running too long (per execution) and needed to be split into smaller components.
So, is setting up and configuring AI is a lot of faff? Well, the best part of this is that it’s almost built-in when hosting your app service with Azure (works out of the box with Azure Functions and requires adding a few lines of code if working with Webjobs).
More on Application Insights can be found here.
App Service Diagnostics is available in Azure Portal. Unlike Application Insights, it shows results on the App Service Plan level and not App Service level.
- Navigate to any app service hosted in the App Service Plan you’d like to investigate.
- Click on Diagnose and solve problems pane
- Under Troubleshooting categories choose Availability and Performance
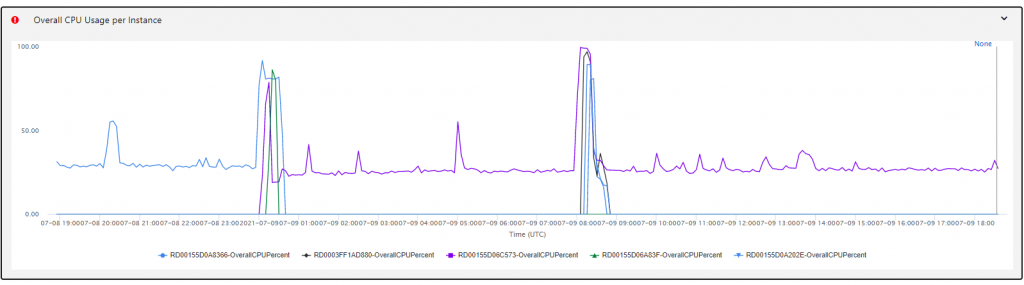
In there, I usually look at High CPU Analysis and Memory Analysis panes. Both of those provide information about your host machine’s overall CPU/memory usage (or per instance) and a Drill down, which breaks it down to individual app services usage per instance.
This information is crucial to identify any problems with your app service plan’s size and also know your distributed systems a little bit better. Observing the behaviour of your host machines helps you determine the patterns of high usage and idle time, helping you settle on a choice of App Service Plans that suit your needs. Make a habit of visiting it daily until you’re comfortable with your systems. They no longer are black boxes then and you can make some cost-saving decisions, like spreading the load throughout the 24h period when your App Service Plan is idle.
Use Correct App Service Plans For Your Needs
App service plans come in all shapes and sizes. The overview of the app service plans pricing is available here. The choice of app service plan for your system will depend on a few factors. I’d divide them into the following categories:
- Compute power
- Compute time
- Memory
You may wonder: how do I know how many resources my application will require? There are ways to find that out, but I personally try experimenting. One massive benefit of using Azure is the ease of moving resources around and it’s crucial to experiment. This can be done with one click.
I would normally determine roughly what I need based on how big the application is, how much it stores in memory, how much time it spends on computing, whether it needs auto-scaling, etc. That would be my baseline. From there, I observe how the resources are being used and check the reliability of my application using the Application Insights and Availability and Performance pane. If I think my current machine is overkill for the services it hosts, I scale it down, or if it underperforms, I scale it up to the next available tier and in both cases, I keep observing the behaviour and availability of my apps.
Another thing to consider is how many App Services you place in a single App Service Plan. There’s no definite answer to this, but it’s worth mentioning that you can host more applications than the recommended value suggests and it should still work fine, it all depends on your apps.
Optimize Scale In and Scale Out Ruleset
If you use any Standard App Service Plan or above, you can benefit from having the auto-scaling option. That means you have full control over when and how your App Service Plan scales in or out depending on factors like CPU usage, RAM usage, or simply scale up at specific times of the day and many others.
It’s important to set that up correctly, so your services still run reliably and don’t experience throttling or run out of memory but remain as cost-effective as possible. Microsoft provides a handy guide on how to get started with it here.
Take Microsoft Cost Management Course
An easy, but very effective piece of advice is to simply take the short course, which is available on the Microsoft website for free. It can be found here.
Spread the CPU Load Over Time
As a business, you may have multiple scheduled jobs that run daily, weekly, or monthly. Because they’re scheduled, you can predict and monitor the load on your App Service Plan. It’s beneficial to spread that load across the 24h period, so you can minimize scaling and make the most of your host machine, so it’s not idle for 90% of the time, and scales to multiple instances for the remaining 10%. To check the load, you can have a look at High CPU Analysis in Availablity and Performance.
Review Your Costs Periodically
The last but perhaps the most important point of the list. Cost management is not a task you should be undertaking annually. Even with all the bases covered, it should be an ongoing process, monitored either weekly or fortnightly. Thinking of the example scenarios, which could have the potential for improvement:
- A resource load usage change – An example of this could be a sudden increase or decrease in the usage of your tool. In the first situation, your current ruleset may not be prepared for a situation like this and experience downtime and take other services down due to CPU throttling. In the latter one, your host machine may now be an overkill for what it is used for and you may benefit from scaling down.
- New technologies – One of the jobs of every developer is to stay on top of what’s new in tech. An example of when this could affect our cost is the introduction of serverless computing or containerization. It’s important to get familiar with new ways of doing things and considering migration after a cost/benefit analysis.
- Growing toolset – Adding new features is easy, but it’s good to remember about the cost of maintenance and technical debt. It’s important to know that we’re okay to add those new resources to the existing servers, or do we have to think about scaling up, out, or consider some optimizations.


